Converting a front garden into a driveway can provide convenient off-street parking and even add value to your home. This step-by-step guide walks you through the entire process – from checking legal requirements to the final finish – in a clear, accessible way. We’ll cover necessary permits, materials, contractors, the construction process, and typical costs. (Note: Regulations can vary by local authority, so always double-check with your council.) 
Check Planning Permission and Council Requirements
Before any work begins, determine if you need permission. In England, paving over a front garden can often be done under “permitted development” (no planning application) if you use a permeable surface or provide drainage on your property. For example, no planning permission is required if your new driveway uses permeable (porous) surfacing (e.g. gravel, permeable block paving, porous asphalt) or if rainwater is directed to a lawn or border to soak away (Planning permission – Paving your front garden – Planning Portal). However, if you plan to cover more than 5m² with impermeable materials and have no on-site drainage, then planning permission is required (Planning permission – Paving your front garden – Planning Portal).
- Local Variations: These national rules apply to houses under normal circumstances. Some areas impose extra restrictions (e.g. Article 4 Directions removing permitted development rights, or conditions on new estates). If you live in a conservation area or a listed building, or if your property is a flat/maisonette, you may also need planning consent (Planning permission – Paving your front garden – Planning Portal) (Planning permission for a dropped kerb | Worcestershire County Council). Always check with your local planning authority when in doubt.
- Classified Roads: If your property is on a main road (classified A, B or C road), many councils require a separate planning permission for creating a new access. For instance, you will typically need to apply for planning permission if the kerb you want to drop is on a trunk or classified road (Planning permission | Cheshire West and Chester Council). Councils like Worcestershire explicitly note that planning approval is needed for new driveways on classified roads or in special areas (conservation zones, etc.) before a kerb can be dropped (Planning permission for a dropped kerb | Worcestershire County Council).
If required, apply for planning permission through your local council (usually the planning department). This involves submitting an application (with a site plan, drawings of your proposed driveway, etc.) and paying a fee (approximately £200 for a householder planning application, in many cases). The decision can take ~8 weeks. Only proceed with construction after you have approval or confirmation that it’s not needed.
Tip: It’s wise to contact your council’s planning office or check the official Planning Portal guidance to confirm requirements early on. Doing so will ensure you design a driveway that complies with rules on drainage and appearance from the start.
Obtain Dropped Kerb Consent (Vehicle Crossing Permission)
In addition to planning rules for the driveway surface, you must have a legal vehicle crossing. It is illegal to drive a vehicle over the pavement (footway) to your property without an authorized dropped kerb (Planning permission – Paving your front garden – Planning Portal). A dropped kerb (also called a vehicle crossover) is the section of kerb and pavement lowered to give your car access from the road. You’ll need to apply to your local council for permission to install one.
- Application Process: Contact your local council’s highways department to apply for a dropped kerb. There is usually a non-refundable application fee (often around £70–£150, depending on the council) (Dropped Kerb Cost: How Much to Drop a Kerb? [2025 UK Guide]). The council will review factors like road safety, nearby junctions, and minimum driveway dimensions. (Many councils require that your front garden is at least ~4.8–5 metres deep and ~2.4–2.7m wide, so a car can park without overhanging the pavement (Apply for a dropped kerb (vehicle crossing) – Roads and transport).) They’ll also check for obstacles such as utility poles, streetlights, or trees that might need relocation or prevent approval (Apply for a dropped kerb (vehicle crossing) – Roads and transport).
- Using Approved Contractors: If your application is approved, the actual work on the pavement must typically be done by the council or an approved contractor. In most cases, you are required to use the council’s own team or a contractor from their approved list to carry out the drop-kerb construction (Dropped Kerb Cost: How Much to Drop a Kerb? [2025 UK Guide]). Do not attempt to DIY this portion – working on the public highway without permission is unlawful.
- Costs for Dropped Kerb: Costs vary by location and width of the access. As a general guide, installing a standard-width dropped kerb (usually 3 to 5 lowered kerb stones) can cost roughly £800 to £1,200 in total (Dropped Kerb Cost: How Much to Drop a Kerb? [2025 UK Guide]). This typically includes labor, materials, and any required changes to the pavement. (The cost may increase if, for example, utilities need moving or if the crossing is extra-wide.) Remember that this cost is separate from your driveway surfacing cost. Your council will provide a quote or fixed fee once the application is processed.
Important: Wait for formal approval and completion of the dropped kerb before you start using your new parking space. Driving over the footpath without a proper dropped kerb could lead to fines or the council asking you to reinstate the pavement. It’s best to coordinate the timing of the kerb works and your driveway installation so that one isn’t damaged by the other. Many homeowners schedule the pavement works to occur toward the end or after the new driveway is built (with temporary ramps or leaving the interface area unfinished until the kerb is dropped).
Plan Your Driveway Design and Choose Materials
With permissions underway, turn your attention to the design of the parking area in your garden:
- Size and Layout: Determine how much of the front garden you want to convert. Ensure there’s enough space for your vehicle(s) and room to maneuver. A typical parking space for one car needs to be about 2.4m wide by 4.8m long minimum (some councils specify ~5m depth) so the car fits entirely on your property (Apply for a dropped kerb (vehicle crossing) – Roads and transport). Mark out the area and consider where the car will enter from the road. Keep in mind any remaining garden or pathways you want to retain for landscaping or access to your door.
- Drainage and Levels: Plan for water runoff management. Your driveway should be level with the dropped kerb at the pavement and ideally slope slightly toward your garden or a drainage point – not toward the public road or your house. If using permeable surfacing, water will soak through; otherwise, you may need to install a drainage channel or soakaway within your garden to capture water. Directing rainwater to a flower bed or lawn area is an acceptable solution to meet regulations (Planning permission – Paving your front garden – Planning Portal). Proper drainage design now will prevent pooling or flooding later.
- Material Options: Choose a suitable surface material that fits your budget and aesthetic. Common driveway surfaces include:
- Gravel – One of the most affordable and permeable options. Gravel (loose stone chippings) allows rain to soak through easily (Planning permission – Paving your front garden – Planning Portal). It has a modest, natural look. You’ll need an edge border to keep stones contained, and periodic raking to maintain an even surface. Cost: approx. £50–£60 per m² (installed) on average (Resin Bound Driveway Cost In 2025 | Checkatrade), making a single-car gravel drive perhaps ~£1,500.
- Concrete or Asphalt (Tarmac) – Hard, solid surfaces. Standard concrete or tarmac is durable and relatively quick to install. However, since they’re impermeable, you must include drainage (or get planning permission if over 5m² with no on-site drainage) (Planning permission – Paving your front garden – Planning Portal). These surfaces give a smooth finish and are low-maintenance. Cost: roughly £90–£95 per m² installed on average (Resin Bound Driveway Cost In 2025 | Checkatrade) (so ~£2,000+ for a single space, depending on size).
- Block Paving – Individual bricks or blocks (concrete or clay) arranged to form the drive. Block paving is popular for its attractive appearance and flexibility in patterns. Opt for permeable paving blocks (which have gaps or porous joints) to comply with drainage rules without extra drains (Planning permission – Paving your front garden – Planning Portal). Standard block paving is slightly more expensive than tarmac but can add curb appeal. Cost: about £100 per m² on average (materials + labour) (Resin Bound Driveway Cost In 2025 | Checkatrade). For example, 50m² might cost ~£5,500 in total (Average Driveway Paving Cost Estimate in 2025 | Checkatrade).
- Resin-bound Gravel – Decorative aggregate mixed with resin, creating a porous, fixed surface. Resin-bound driveways are smooth, wheelchair-friendly, and come in various colors while still being permeable. They tend to cost more than loose gravel. Cost: roughly £120 per m² (installed) on average (Resin Bound Driveway Cost In 2025 | Checkatrade) – about £2,800 for a small single-car drive and up to £6,000–£10,000 for larger areas (Resin Bound Driveway Cost In 2025 | Checkatrade).
- Others: You could also consider porous grass reinforcement grids (plastic or concrete grids that allow grass to grow through), or cobblestone setts for a classic look (cobblestone costs can vary but often are higher-end). Ensure any choice complies with permeable requirements or includes drainage provision.

- Aesthetics and Practicality: Check if there are any local design guidelines (some areas ask for retaining a certain green space or prohibit hard standings in front of period homes). Even if not, it’s good to keep some greenery for appearance and biodiversity. You might incorporate a small border, flower beds, or planters around the new parking spot to soften the look. Also consider how the new driveway will line up with existing paths or your front door – you may want to integrate a paved footpath or step for convenient access.
By carefully planning layout, drainage, and materials now, you’ll create a driveway that is both functional and compliant with regulations. Sketch a simple plan of the proposed area – you may need this for permit applications and to get quotes from contractors.
Find the Right Contractors and Gather Materials
Converting a front garden to a driveway typically isn’t a pure DIY job – it involves significant excavation, waste removal, and specialist surfacing work. Here’s who and what you’ll likely need:
- Professional Contractors:
- Driveway Installer/Landscaper: A professional driveway installer or experienced landscaper will handle the excavation, base preparation, and laying of your chosen surface. Seek out contractors with good local reviews or accreditations. You can use directories or ask for recommendations. It’s wise to get multiple quotes to compare prices and ensure the contractor understands council requirements (like using the right sub-base for permeable paving, etc.). For block paving or resin, ensure the installer has specific experience with those materials.
- Council-Approved Kerb Contractor: As noted, the dropped kerb must be installed by your local council or a contractor they license (Dropped Kerb Cost: How Much to Drop a Kerb? [2025 UK Guide]). Often, when your dropped kerb application is approved, the council will either schedule their team or provide you a list of approved firms. Coordinate with them so that the timing aligns with the driveway work. Sometimes the council will handle everything related to the footpath and you just pay their fee, in other cases you hire an approved contractor yourself (but still under council inspection).
- Other Specialists (if needed): In some cases you might need an electrician (for adding lighting or an electric vehicle charging point), a surveyor (if there are boundary or level issues), or a tree surgeon (if a tree root needs managing). These are optional and depend on your specific site. Most standard conversions won’t require an architect or engineer, but if your design is complex (e.g. involving structural retaining walls on a sloped garden), consult an appropriate professional.

- Key Materials & Supplies:
- Sub-base Aggregate: Nearly all driveways need a compacted sub-base layer. Commonly MOT Type 1 crushed stone is used (or Type 3 for better permeability). Expect to lay about 100–150mm of compacted hardcore for a sturdy foundation.
- Edging: Strong edging restraints to outline the drive and hold the surface in place. These could be concrete edging blocks, brick pavers on edge, timber sleepers (treated for ground contact), or metal edging strips depending on the design. Edging is critical especially for loose gravel (to keep stones in) and block paving (to prevent spread).
- Surfacing Material: The main surface material (gravel, blocks, asphalt, etc.) as chosen in your design. Calculate the area in square meters to order sufficient quantity (with a bit extra for waste or cuts in case of pavers). If using block or brick pavers, you’ll also need jointing sand (and possibly a bit of cement for edge courses). For resin-bound, the contractor will supply the resin and aggregate mix.
- Drainage Components: If required, get drainage items like a channel drain (e.g. a linear trench drain across the driveway entrance or along the house) and pipes or soakaway crates to direct water to a soakaway pit in your garden. Also have some coarse sand or geotextile membrane if your design calls for a filtration layer beneath permeable surfaces.
- Other Equipment: The contractor will typically provide heavy equipment like a mini-digger (excavator) to dig out the garden and a vibrating plate compactor (“wacker plate”) to compact the sub-base and, for block paving, to settle the blocks. They’ll also handle disposal (skip hire) for the soil and garden debris removed. Ensure your quote covers waste removal, as digging out a front garden can produce a lot of soil that needs to be hauled away.
Before work starts, confirm you or your contractor have all necessary permits in hand (planning approval if needed, drop kerb consent, etc.). Also consider informing your neighbours of the planned work – there will be some noise and disruption during excavation, and it’s courteous to let them know the timeline. Check if any on-street parking suspension is needed for skip placement or for the works (your contractor can often arrange this with the council if required).
Step-by-Step Construction Process
With plans and permits ready and contractors on board, the actual construction can proceed. Here’s an overview of the process from start to finish:
Site Preparation and Marking
Clear the front garden area of any plants, rocks, or structures where the driveway will go. If there are small trees or shrubs you want to save, transplant them beforehand. Mark the boundaries of the driveway with spray paint or string lines. Ensure any utility covers in the area are identified – they may need adjustment during the build.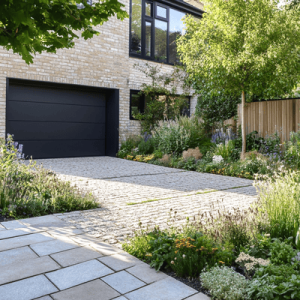
Excavation
The contractor will excavate the marked area to the required depth. Typically, a depth of around 200–250mm (8–10 inches) is removed: this makes room for a hardcore sub-base plus the thickness of your finishing surface (e.g. paving block + bedding sand, or asphalt layers). They’ll also remove the topsoil and any soft or loamy material until firm ground is reached. It’s crucial to excavate slightly beyond the planned edges of the driveway to accommodate edging stones or formwork. All excavated soil and debris should be carted off site (usually into a skip).
Laying the Sub-base
A solid sub-base is the foundation of a long-lasting driveway. A layer of compacted aggregate (often MOT Type 1 crushed stone) is spread across the excavated area, typically about 100–150mm thick (compressed). For permeable driveways, a more open-graded stone (Type 3 or 4/20 aggregate) may be used to allow water storage. The crew will lay the stone in layers (perhaps 2 layers of 75mm each), compacting each layer thoroughly with a vibrating plate compactor or roller. The sub-base should cover the whole area, right up to the edges. This step creates a stable platform that bears the vehicle’s weight and prevents sinking or rutting later. At this stage, if any drainage pipes or soakaway crates need to be installed beneath the drive, the excavations and placements are done before fully finishing the sub-base.
Install Edging/Borders
Edging restraints are installed to define the driveway borders. Depending on your design, this could mean setting concrete edging blocks or kerb stones in concrete along the sides of the drive, or securing metal edging strips. For example, concrete or brick edgings might be laid on a bed of mortar to ensure they stay fixed. The top of the edging is usually set flush with the finished driveway level (or slightly above for containment). Good edging will keep blocks or gravel from spreading outward under the weight of cars. It also gives a neat, framed look. If your driveway will meet your house or fence on one side, that edge might not need a separate border (the wall acts as an edge). Ensure there’s an edge at the pavement side too (often the first row of blocks or a concrete fillet there) so that the interface with the footpath is tidy once the kerb is dropped.
Bedding Layer (if applicable)
For block paving or certain pavers, a bedding layer of sharp sand is spread over the sub-base (commonly ~30–50mm thick). This sand layer is screeded flat to provide a level bed for the blocks. It may be lightly compacted or left loose depending on the system. (Note: For permeable block systems, a different bedding material like 2–6mm grit may be used instead of sand to allow water through.) If you are laying flags/slabs, they might be laid in specific spots or a full bed of mortar instead. Gravel drives usually don’t need a sand layer; the gravel goes directly on the compacted base (possibly with a layer of landscape fabric separator).
Laying the Surface
Now the visible surface is installed:
- Block Paving: Start at one corner and lay the paving blocks on the prepared bed according to your chosen pattern (herringbone, stretcher bond, etc.). Spacers or the block shape will automatically leave small gaps for jointing. Cut blocks will be needed at the edges or to fit patterns – a saw or block splitter is used. Once all blocks are laid, kiln-dried sand is brushed into the joints and the plate compactor is run over the surface to set the blocks and vibrate sand into the joints fully. This locks them together.
- Concrete: If you chose a concrete slab, the team will set up formwork (timber frames) around the area and pour ready-mix concrete to a thickness of ~100+ mm. It will be levelled and left to cure. They may brush the surface for a non-slip texture or add expansion joints if large area. (Make sure any slope directs water to a drain or garden, not onto the street).
- Asphalt (Tarmac): The installers lay hot bituminous asphalt in usually two layers – a coarse base course and a finer top course – with a total thickness around 75–100mm. They are spread and then compacted with a roller. The result is a smooth black driveway. Asphalt should also be sloped for drainage.
- Gravel: A layer of gravel (typically 2–20mm diameter stones, depending on preference) is spread over a geotextile (to stop it sinking into the sub-base) at a depth of about 40-50mm. It’s raked level. Optionally, a gravel retention grid system could be used to stabilize the stones and prevent shifting.
- Resin-Bound: The contractor will mix the chosen aggregate with a resin binder on site and then spread it over the prepared base (often a concrete or asphalt base is needed underneath). They trowel it smooth to ~15mm thick. It then cures to a solid, textured finish.
Whatever the material, ensure the finished level meets the threshold of the pavement correctly where the drop kerb will be, and that you’ve maintained the correct falls (slope) for drainage. Double-check that gates, steps, or front doors are still accessible and at a suitable height relative to the new drive.
Finishing Touches
After the surface is laid, there are a few final tasks:
- If you installed drainage channels, make sure they are not blocked and are connected to the soakaway or outlet properly.
- Remove any excess sand or debris. For block paving, a final sweep of sand and maybe sealing (optional) can be done. For gravel, hose it down to settle dust.
- If the works disturbed any adjacent lawn or flower beds, tidy up and re-seed or replant as needed. Replace any pathway sections or edging beyond the drive that were temporarily removed.
- The dropped kerb construction (if not done yet) will need to be completed by the council’s contractor. They will lower the kerb stones on the pavement edge and reinforce the footpath to handle a vehicle’s weight. Ensure your new driveway’s edge aligns with the lowered kerb smoothly. Once they finish, there might be a concrete fillet between your drive and the pavement for a seamless ramp.
- Finally, consider installing any extras now, such as a security post (to prevent unwanted parking if that’s a concern), motion-activated lights for illumination, or even wiring for an electric car charger if you plan to charge a vehicle on the drive in the future. It’s easier to lay cables or ducts before everything fully sets, if needed.
 After completion, allow any new concrete or resin to cure as recommended (often a few days) and avoid parking on it immediately. For asphalt, it cools and sets quickly, but it’s wise to be gentle in hot weather for a while. Block and gravel surfaces are ready for use almost immediately once installed and compacted.
(10 Ideas For Front Gardens With Drives | Marshalls) A newly installed block-paved driveway with ample space for parking. Proper construction – from sub-base to surfacing – ensures your converted front garden is durable and compliant with regulations.
Costs and Budget Estimates
Budgeting for a front garden-to-driveway conversion involves several components. Below is a breakdown of typical costs in England (rough averages – actual prices will vary by region and specifics):
- Planning and Permits: If required, a planning application costs ~£200 (householder rate) in England. A dropped kerb application fee is usually around £70–£150, depending on council (Dropped Kerb Cost: How Much to Drop a Kerb? [2025 UK Guide]). The construction of the dropped kerb itself averages about £800–£1,200 for a standard crossover (Dropped Kerb Cost: How Much to Drop a Kerb? [2025 UK Guide]) (wider crossings or complex cases can cost more). These are upfront costs before the main building work. Always check what your local authority charges; for example, some councils have higher application fees that include inspections, etc.
- Driveway Construction (Materials + Labour): The surface material choice greatly influences cost. Here are typical installed cost ranges per square meter (including labor and standard base preparations):
- Gravel: ~£50–£60 per m² (Resin Bound Driveway Cost In 2025 | Checkatrade). (For instance, ~£1,500 for a 25m² single car driveway.)
- Tarmac (Asphalt): ~£90 per m² (Resin Bound Driveway Cost In 2025 | Checkatrade). (Approximately £2,000–£2,500 for a single drive, more for high-spec finishes.)
- Concrete: ~£90–£100 per m² (Resin Bound Driveway Cost In 2025 | Checkatrade). (Around £2,000+ for a basic single car area. Coloured or patterned concrete may cost more.)
- Block Paving: ~£100–£120 per m² on average (Resin Bound Driveway Cost In 2025 | Checkatrade). (E.g. a 50m² two-car driveway might be ~£5,000–£6,000 total (Average Driveway Paving Cost Estimate in 2025 | Checkatrade). Choosing cheaper concrete blocks vs. premium stone setts makes a difference in price.)
- Resin-Bound: ~£120 per m² (Resin Bound Driveway Cost In 2025 | Checkatrade). (Approximately £2,800 for a small 20m² drive up to £6,000 for 50m², as per recent figures (Resin Bound Driveway Cost In 2025 | Checkatrade)).
These figures include typical labor and materials. Note that smaller jobs might have a higher per m² cost due to fixed overheads, and prices can increase if you need significant extra work (e.g. digging out deep tree roots, building retaining walls, relocating utilities). If your front garden is currently elevated or lower than the pavement, factor in the cost of constructing a ramp or retaining structure to reach street level smoothly.
- Additional Expenses: Don’t forget potential extras:
- Waste Removal: Hiring a skip for soil waste can cost £150–£300 per week depending on size (How Much Does A Driveway Cost in 2025? | Checkatrade), often included in contractor quotes.
- Landscaping & Finishing: Replacing fences, adding gates, or landscaping the edges of the new driveway will add to the budget. A simple front gate might be a few hundred pounds; new turf or planting beds also have costs.
- Maintenance Costs: Consider long-term costs. Gravel may need periodic top-up (£50 a ton occasionally), asphalt might need resealing or patching after 5-10 years, and block paving could require weed prevention or re-sanding. These are minor annual costs but worth noting.
Always get detailed quotes from at least two or three contractors. The quote should itemize the scope: excavation, sub-base, materials, disposal, and any specific council requirements. This helps ensure all necessary work is included and there are fewer surprise costs. Remember that investing in good preparation (permits, sub-base, drainage) might increase upfront cost but will prevent costly issues down the line (like driveway flooding or sinking). 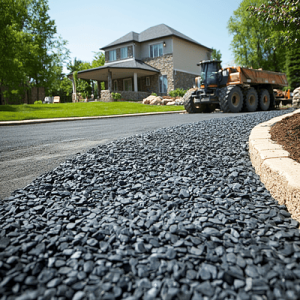
Final Tips and Considerations
Converting your front garden into a parking space is a construction project that must balance practical needs with regulations and aesthetics. Keep these final tips in mind for a successful project:
- Follow Local Guidance: Always adhere to your local council’s rules and recommendations. Councils may have published guidelines on residential crossings and driveways – for example, specifications on the thickness of the hardstanding or required visibility splays if your drive exits onto a road. Non-compliance could lead to enforcement or having to redo work. When in doubt, consult the council or refer to official resources (like the UK Planning Portal or government guidance on permeable paving (Planning permission – Paving your front garden – Planning Portal)).
- Safety First: If you’re undertaking any portion of the work yourself, read up on safety (the UK Health and Safety Executive has resources on construction safety for small projects). Wear protective gear during excavation and take care with any power tools. If contractors are doing the work, ensure they have public liability insurance and follow safety protocols, especially when working near the public pavement.
- Neighborly Considerations: Your new driveway will change the look of your property’s front. Discuss plans with any neighbors who might be affected – especially if you share a front garden boundary or if on-street parking patterns will change. Sometimes multiple neighbors apply for adjacent dropped kerbs together to save on costs or maintain symmetry. Additionally, if your area has a residents’ parking scheme, update any permits since you’ll be parking off-street.
- Environment and Flooding: Front gardens collectively help with urban drainage and greenery. If possible, try to keep some green areas or use permeable designs. Not only does this avoid the need for planning permission (Planning permission – Paving your front garden – Planning Portal), it also helps reduce runoff that can contribute to local flooding. You can integrate a strip of soil or gravel along the edges of the drive to act as a soakaway. Every bit of planting (like preserving a small flower bed or adding planters) can preserve some of the original garden feel and support local biodiversity.
- Completion and Usage: Once your driveway and dropped kerb are complete, you’re ready to use your new parking space. Be cautious the first few times to get used to the turning angle and ensure not to clip the edges or drive over any remaining curb. If the council requires a final inspection (some do for the kerb), make sure that’s done and signed off. Keep all documentation (planning approval, drop kerb consent, contractor warranties) filed safely in case you need them in the future or when selling the property.
By following this guide step-by-step – from initial planning, securing permits, choosing the right materials, through to hiring professionals and managing construction – you can transform your front garden into a useful driveway with confidence. Always do thorough research and don’t rush the planning stage. With the proper permissions and a good contractor, the result will be a convenient, legal off-road parking space tailored to your needs. Good luck with your project!
References & Useful Resources:
- Planning Portal – Paving your front garden: Planning Permission rules (Planning permission – Paving your front garden – Planning Portal)
- UK Government Guidance – Permeable Surfacing of Front Gardens (explains drainage options for driveways) (Planning permission – Paving your front garden – Planning Portal)
- Local Council Example – Worcestershire County Council: Dropped Kerb Planning Permission Guidelines (Planning permission for a dropped kerb | Worcestershire County Council)
- MyJobQuote – Dropped Kerb Cost Guide (UK) (Dropped Kerb Cost: How Much to Drop a Kerb? [2025 UK Guide])
- Checkatrade – Driveway Cost Guides (2024–2025 averages for UK) (Resin Bound Driveway Cost In 2025 | Checkatrade) (Average Driveway Paving Cost Estimate in 2025 | Checkatrade)
Contact us to realize your project.