Building a roof extension (such as a loft conversion or adding dormer windows) can unlock valuable space in your home. Below is a step-by-step guide for homeowners in England, with a focus on planning rules and regulations. We’ll cover everything from initial planning and permissions to building regulations, documentation, and avoiding common pitfalls.
Initial Planning Considerations
Before you draw up plans, assess the feasibility and potential impact of your roof extension: 
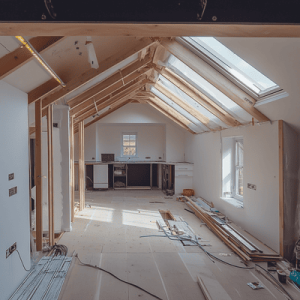
- Check Loft Feasibility: Make sure your existing loft or roof can be converted. Measure the head height (from floor joists to roof ridge) – you’ll typically need at least about 2.2m of clear height for a comfortable conversion (Loft Conversion Process: Step by Step Guide). Also evaluate the roof structure’s condition; older roofs might need reinforcement, so consider having a structural engineer inspect it (Loft Conversion Process: Step by Step Guide).
- Impact on Neighbours: Think about how your extension could affect adjacent homes. For example, adding dormer windows could introduce overlooking, and construction can cause noise and disruption. It’s wise to talk to your neighbours early about your plans to maintain good relations and address any concerns. You may also need to comply with the Party Wall Act if your home is semi-detached or terraced (shared walls or roof structures) (Loft Conversion: Where Do I Start? – HomeOwners Alliance) – this means notifying neighbors in advance and possibly getting a party wall agreement before work starts.
- Local Restrictions: Research whether your property has any constraints. If you live in a conservation area or the building is listed, or if previous owners already extended the roof, special rules may apply. Homes in designated areas (e.g. Conservation Areas, National Parks) often require full planning permission for roof changes (Loft conversions: The ultimate guide | FMB, Federation of Master Builders). Also verify that you have Permitted Development rights intact (some newer homes or areas have these rights removed). Checking with your local council’s planning department about any site-specific restrictions is a good early step.
By doing this initial due diligence, you’ll have a realistic sense of what’s possible and can plan a design that fits both your home and its surroundings.
Determine if You Need Planning Permission (Permitted Development)
Not all roof extensions require planning permission. England’s Permitted Development (PD) rights allow certain loft expansions without a full planning application, as long as you meet specific limits and conditions. Key criteria for a loft/roof extension to be PD include:
- Volume Limit: The added volume must not exceed 40 cubic meters for terraced houses or 50 cubic meters for semi-detached and detached houses (any previous roof extensions count toward this limit) (Loft conversions: The ultimate guide | FMB, Federation of Master Builders).
- Roof Alteration Limits: The extension must not exceed the existing roof height (you can’t raise the ridge) and must not extend forward beyond the plane of the existing roof slope on the front (highway-facing) side (Loft conversions: The ultimate guide | FMB, Federation of Master Builders). In practice, this means most dormers should be on the rear or side of the house.
- Design Constraints: The extension should not include features like balconies or roof terraces, and it must use materials similar in appearance to the existing house roof (Loft conversions: The ultimate guide | FMB, Federation of Master Builders). Any new side-facing windows must be obscured-glass and have an opening pane at least 1.7m above the floor to protect neighbors’ privacy (Loft conversions: The ultimate guide | FMB, Federation of Master Builders). Also, if adding dormers, they should be set back at least 20cm from the original eaves where feasible (Loft conversions: The ultimate guide | FMB, Federation of Master Builders) (so the dormer doesn’t overhang the existing wall).
If your planned roof extension stays within these bounds, it falls under PD rights and planning permission is not required. Always double-check current guidelines (the government’s Technical Guidance on Permitted Development is a helpful resource and consider seeking advice from your local planning authority if unsure. For absolute certainty, you can apply for a Lawful Development Certificate from the council to confirm your roof extension is legal under PD. This certificate isn’t mandatory but can be useful when selling the house to prove the work didn’t need planning permission. (Loft conversions: The ultimate guide | FMB, Federation of Master Builders)
Example: A full-width rear dormer roof extension (as shown above) can often be built under Permitted Development if it stays within size limits and does not exceed the existing roof’s height (Loft conversions: The ultimate guide | FMB, Federation of Master Builders). Such an addition significantly increases usable attic space while avoiding the need for a planning application. Always ensure the design meets PD criteria – if not, you will need to go through the formal planning permission process.
If your proposal doesn’t meet PD requirements – for instance, you want to raise the roof height, or your home is in a conservation area – then you must apply for planning permission. This involves submitting a Householder Planning Application to your local council. The application will include detailed plans of the proposed changes and a site plan, and the council will assess factors like the extension’s appearance and its impact on neighbors and the street scene. The review period is typically up to 8 weeks for a decision on householder applications (How Long Does It Take to Get Planning Permission? 8 or 13 Weeks? – Urbanist Architecture – Small Architecture Company London). During this time, neighbors may be notified and given a chance to comment (How Long Does It Take to Get Planning Permission? 8 or 13 Weeks? – Urbanist Architecture – Small Architecture Company London). If approved, you’ll receive a planning permission notice with any conditions to follow. (If refused, you can modify your plans or appeal, but it’s best to aim for compliance from the start to avoid delays.)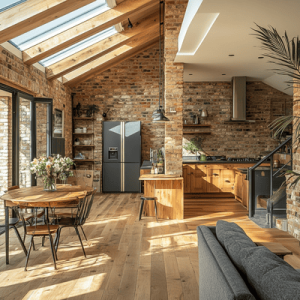
Tip: If you do need to apply for planning permission, consider hiring an architect or planning consultant to prepare the application. A well-prepared application with clear drawings and supporting information can smooth the process. And remember, even if no planning permission is required, the work still must comply with building regulations and other legal checks (more on that next).
Building Regulations Approval
Whether or not you needed planning permission, Building Regulations approval is always required for a roof extension in England (Loft conversions: The ultimate guide | FMB, Federation of Master Builders). These regulations ensure the construction is structurally sound and meets essential safety standards (for example, adequate structural support, fire safety, insulation, ventilation, and safe access via stairs) (Loft Conversion: Where Do I Start? – HomeOwners Alliance). In a loft conversion, building regulations cover things like the strength of new floor joists, roof stability, escape windows, smoke alarms, staircase design, and insulation values, among others (Loft Conversion: Where Do I Start? – HomeOwners Alliance).
How to get approval: You will need to engage either your local authority Building Control service or an approved private inspector to oversee the project. There are two main routes to obtain building regs approval:
- Full Plans Application: This is the more thorough route. You (or your architect/designer) submit detailed architectural drawings, structural calculations, and specifications to Building Control before construction begins. The plans are checked for compliance with all relevant regulations. You’ll typically get a decision (an approval, conditional approval, or request for modifications) within about 5–8 weeks (Building control regulations for an extension – Design for Me). An approved full plans application gives you peace of mind that if you build according to those plans, you will meet the regulations.
- During construction, a Building Control inspector will visit at key stages (for example, after structural beams are in, or insulation is installed) to inspect the work (Building control regulations for an extension – Design for Me). Once everything is completed in compliance, you’ll receive a Completion Certificate at the end as official proof that the extension meets building regs.
- Building Notice: This route is quicker for getting started, but involves more risk. Rather than submitting detailed plans for checking, you simply notify Building Control at least 2 days before you intend to commence work (Building control regulations for an extension – Design for Me). You won’t get prior approval on the plans – the inspector will only check on site as the work progresses. This is usually used for very small or straightforward projects.
- If you choose this route, it’s critical that your builder is very experienced with building regulations compliance. Any mistakes will have to be corrected (in worst cases, work might need opening up or rebuilding to fix issues). As no formal plan approval is given upfront, there’s a higher responsibility on the homeowner/builder to get it right. For anything but the simplest roof alterations, the Full Plans route (or at least having professional plans drawn up) is highly recommended (Building control regulations for an extension – Design for Me) to avoid costly surprises.
In both cases, don’t start building without involving Building Control. It’s illegal to do so and can lead to big problems – the council can require you to uncover or redo work that doesn’t meet standards (Building control regulations for an extension – Design for Me). Also, an unapproved extension can create issues with home insurance and future sale of the property. So, ensure you have either an approved plan or a submitted notice before the hammer hits the nail. Make sure to budget for the Building Control fees as well – local councils charge a fee for plan checking and site inspections, typically a few hundred pounds, varying by project size.
During construction, work with your Building Control inspector’s schedule: they will outline which stages of work require inspection (foundation work, structural beam installation, insulation, etc.). Keep them informed so they can sign off each stage – this prevents delays in getting the final sign-off.
Prepare the Necessary Documentation
Undertaking a roof extension involves quite a bit of paperwork and plans. Here’s what you’ll typically need to have in order:
- Design Drawings: You will need clear architectural drawings of your proposed extension. This includes existing and proposed floor plans and elevation drawings (side and front/rear views of your house with the new roof profile). These drawings are used for both planning and building regs applications. They should be to scale (commonly 1:50 or 1:100) and accurately dimensioned so that approvers and builders understand the proposal (Planning Permission Drawings: What do I Need? – DeVis Architecture).
- If applying for planning permission, you’ll also need a site location plan (showing your property in context on a map) and a block/site plan showing the building footprint on your plot (Planning Permission Drawings: What do I Need? – DeVis Architecture) .
- Structural Calculations: Since a roof extension often involves adding beams, joists, or even removing parts of the roof structure, a structural engineer will typically provide calculations. These calculations show that the new structure (e.g. steel beams, floor joists, dormer framework) can support the loads safely. Building Control will review these as part of the approval. For example, if you’re cutting into existing roof trusses or adding a dormer, an engineer will specify how to reinforce the roof. Many builders will ask for structural calculations to be done by an engineer if they aren’t provided (Loft Conversion: Where Do I Start? – HomeOwners Alliance).
- Building Regulations Plans & Specs: For a Full Plans submission, your designer will produce detailed construction drawings that go beyond the planning drawings. These might include cross-sections through the building, details of insulation, ventilation, fire safety measures, etc., along with written specifications. These documents show how the extension will comply with regulations – e.g. the thickness of insulation in the roof, the model of escape rooflight, staircase details, etc. If you’re using the Building Notice route, you won’t submit these for approval, but you should still have them for your own use and for the builder to follow.
- Planning Application Documents (if needed): If applying for planning permission, you’ll fill out the council’s application form (often done online via the Planning Portal). Along with the form and scaled drawings mentioned above, you may need to include a Householder Planning Checklist (some councils provide a list of required info) and pay the fee (usually about £200 for a householder application). You generally do not need a formal Design & Access Statement for a straightforward house extension unless the property is in a sensitive location, but check local requirements. The key is to supply all required drawings and information; missing items can delay validation of your application (Householder Application for Planning Permission for Works).
- Party Wall Notice: If the Party Wall Act applies (shared walls or structures with neighbors), you will need to serve formal notice on the adjoining owners at least 2 months before work begins. This is a written document describing the work. Neighbors can consent or dissent; if they dissent, you may need to hire a party wall surveyor to draw up an agreement. Keep copies of all notices and agreements as part of your documentation.
- Contracts and Insurance: While not a permission document, it’s wise to have a written contract with your builder or loft company, detailing the scope of works, timeline, payment schedule, etc. Also ensure you inform your home insurer about the project; you or your contractor should have appropriate insurance during the build.
Having all these documents prepared and organized will make the approval process smoother and provide a clear roadmap for the construction phase. A good architect or loft specialist will usually handle preparing most of the necessary drawings and documents on your behalf (Loft Conversion Process: Step by Step Guide), but as the homeowner, it’s helpful to understand what’s needed and to double-check that nothing is missing.
Working with Professionals (Architects, Engineers, Contractors)
A roof extension is not a DIY job for most homeowners – it requires design savvy and structural know-how. You’ll likely need one or more qualified professionals to help turn your idea into reality:
- Architect or Architectural Technologist: Hiring a design professional is highly recommended, especially for designing the space and navigating permissions. An architect or technician can create the plans for your extension, advise on layout options, and ensure the design meets planning and building regulation requirements.
- They can also handle the planning application process for you and even help solicit builder quotes or oversee the project if you want (Loft Conversion: Where Do I Start? – HomeOwners Alliance). If an architect’s fees seem high, remember that their expertise can save you money by avoiding design mistakes and delays, and you can often choose a limited service (just planning drawings, for example) to fit your budget.
- Specialist Loft Conversion Company: These companies offer a one-stop solution – they will design and build the extension for you. They usually have in-house designers or architects who draw up plans and handle permissions, and their own construction teams to execute the build (Loft Conversion: Where Do I Start? – HomeOwners Alliance). This can simplify the process since one company takes responsibility for the whole project. When choosing a design-build firm, check their track record and ask to see examples of similar projects they’ve completed.
- Structural Engineer: If you hire an architect or loft company, they will typically bring in a structural engineer at the appropriate stage. However, if you are managing things yourself or using a general builder, you may need to directly hire a structural engineer to provide beam calculations and any necessary structural drawings (Loft Conversion: Where Do I Start? – HomeOwners Alliance). The engineer’s input is critical to ensure your new roof floor doesn’t overload existing walls, and that any structural alterations are safe. They usually work on a fixed fee per calculation or structural element, or an overall fee for the project’s structural design.
- Builder/Contractor: Finally, you need a competent builder to carry out the construction. If not using a loft specialist company, you should get quotes from several builders who have experience with loft conversions or extensions. Look for builders with good references or certifications (for example, membership in the Federation of Master Builders can be a positive sign). Always ensure the builder is familiar with building control inspections and will coordinate with the inspector during the build.
- For a roof extension, the builder will handle tasks like structural alterations to the roof, installing steel beams, constructing dormer frames, fitting insulation, relocating electrical/plumbing systems, and finishing the interior. Make sure to have a detailed contract with timeline and payment stages. It’s common to not pay all money upfront – instead, pay in installments as work progresses, with the final payment upon completion and Building Control sign-off (Extensions – a homeowner’s guide to extending your living space).
Communication and management: Whichever route you choose, maintain regular communication. If you have an architect managing the project, they can liaise with the builder and inspector. If you’re managing it yourself, be prepared to schedule inspections, keep the project on track, and handle any issues that arise. Regular site meetings with your contractor (and designer, if applicable) will help ensure everyone is on the same page. 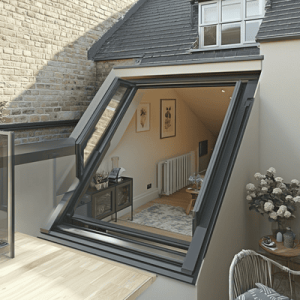
Also, factor in professional lead times – a good architect or builder might not be available to start immediately. It’s common to wait a few weeks or months for the right professional, so start your search early in the planning stage.
Timeline Expectations from Start to Finish
Understanding the timeline helps set realistic expectations and plan your life around the project. Here’s a rough breakdown of stages and how long they might take:
- Design and Planning Stage (several weeks to a few months): In this initial phase, you’ll be working on the design with your architect/designer and preparing any planning application if required. Designing the scheme and getting drawings ready can take a few weeks up to a couple of months, depending on complexity and how decisive you are.
- If you need planning permission, add the council’s decision period – typically 8 weeks for a householder application (How Long Does It Take to Get Planning Permission? 8 or 13 Weeks? – Urbanist Architecture – Small Architecture Company London). (In some cases it can extend a bit longer, especially if revisions are needed or delays occur, but most straightforward proposals get a decision within 2 months.) If no planning is needed due to Permitted Development, you save this time, though you might still wait ~8 weeks if you choose to obtain a Lawful Development Certificate. During this stage, also account for time to get a party wall agreement (which can be done in parallel; by law it’s a 1–2 month notice process if required).
- Building Regulations and Pre-Construction (a few weeks): If you went the Full Plans route for Building Regulations, the plan check could take up to 5-8 weeks (Building control regulations for an extension – Design for Me), but you don’t necessarily have to wait for full approval to start scheduling the build – often you can start once plans are submitted and an initial inspection is done, especially if the designer and builder are confident. (Many people overlap this with the planning permission wait.) If using a Building Notice, this phase is shorter – you just notify and can start after 2 days. Also, take time here to finalize your builder contract and ensure materials (like special-order windows or steels) are ordered in advance.
- Construction Phase (about 1–3 months): Once on-site work begins, a typical loft conversion or roof dormer extension can take somewhere in the range of 4 to 8 weeks of building time for an average project (How long will a loft conversion take? – MyBuilder). Simpler projects (like installing roof windows and reinforcing the floor without dormers) might be on the lower end (even around a month), while more complex ones (multiple dormers, structural changes, or a mansard roof extension) could push towards 10–12 weeks (How Long Does a Loft Conversion Take? | Checkatrade) or more. Factors like your builder’s team size, weather conditions, and any unexpected issues (e.g. discovering needed repairs for existing structure) can affect the schedule (Loft conversions: The ultimate guide | FMB, Federation of Master Builders).
- During this phase, the crew will be cutting open the roof, installing support beams, building out dormer structures, adding insulation, running electrical and plumbing extensions, fitting windows, and constructing the staircase, followed by plastering and finishing. It can be disruptive, but a good contractor will aim to keep your home dry and secure throughout (often the roof is only open for a brief period and quickly sealed up with the new structure).
- Completion and Sign-Off (a few days): After the main construction is done, there’s a wrap-up period. The Building Control inspector does a final inspection to ensure everything complies. You might have a short snagging period where any minor faults are corrected. Once you have the Completion Certificate from Building Control and you’re satisfied with the workmanship, you can make final payments and start using your new space!
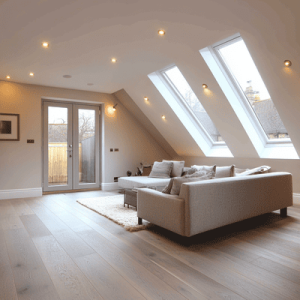
In total, from project inception to finish, many homeowners find it takes around 4–6 months. If planning permission is involved, expect the longer end of that range (or beyond, in case of delays). If everything is under PD and you have ready professionals, it could be a bit faster. Always build in some contingency in your timeline; for example, bad weather could slow roofing work, or the council might take a couple extra weeks during a busy period. By understanding each stage, you can better coordinate tasks (for instance, lining up your builder to start as soon as permissions are in place) and have a realistic outlook on when the project will complete.
Tips for Avoiding Common Issues or Delays
Even small extensions have lots of moving parts. Here are some tips to help your roof extension project go smoothly and avoid common pitfalls:
- Communicate Early and Often: As noted earlier, speak with your neighbours about your plans ahead of time. This can prevent objections during the planning stage and facilitate cooperation (they’ll be more likely to grant access for scaffolding or tolerate noise if they feel respected). Also, if a party wall agreement is needed, start that process early to avoid last-minute legal delays. It’s a legal requirement to notify neighbors well in advance (Loft Conversion: Where Do I Start? – HomeOwners Alliance), so don’t procrastinate.
- Stay Within Permitted Development (if feasible): To save time and effort, try to design your roof extension within PD limits if that achieves your goals. This lets you bypass the formal planning application and the 8+ week wait (Loft Conversion: Where Do I Start? – HomeOwners Alliance). For example, if slightly scaling back the size of a dormer keeps you under the volume threshold, it might be worth it to avoid needing permission. This isn’t always possible, but many loft conversions are designed specifically to fit PD rules and thus “fast-track” the project.
- Choose Reputable Professionals: Avoid the temptation to go with the cheapest quote if a contractor’s credentials are dubious. A reliable, experienced team might cost more upfront but will likely save you from poor workmanship or project overruns. Check references or use recommended traders. Get at least three quotes and compare not just price but also proposed timeline, approach, and what’s included (Loft Conversion: Where Do I Start? – HomeOwners Alliance). Ensure your builder has appropriate insurance and will sign a contract. A “cowboy” builder can cause huge delays or leave you needing costly corrections.
- Plan Thoroughly and Don’t Rush the Prep: Make sure your plans are detailed and accurate. Mistakes or omissions in drawings can lead to problems getting approvals or change orders during construction. Double-check measurements and compliance with rules (your architect will help with this). It’s also wise to lock in big decisions (like dormer width, window placements, stair layout) before construction starts to avoid changes mid-build. Essentially, measure twice, build once.
- Schedule Smartly: Work with your contractor to set a realistic schedule and build in some slack. For instance, weather can be a factor – roofing work in winter storms will take longer, so consider scheduling major roof exposure tasks in milder months if possible. Agree on a target completion date but understand it’s an estimate. Some experts suggest having an agreed contingency plan with your builder for any unexpected delays (Loft conversions: The ultimate guide | FMB, Federation of Master Builders). It’s better to anticipate a project might run a week or two over than to plan things to the wire.
- Stay on Top of Project Management: If you’re not using a project manager, the responsibility is on you as the homeowner to keep things coordinated. Ensure that inspections are happening on time (don’t be shy about confirming the builder called the inspector for that insulation check, for example). Keep a folder (physical or digital) with all permits, certificates, warranties, and receipts. If an issue crops up, address it quickly by talking with your builder or architect – small problems are easier to fix before they become big ones.
- Financial Buffer: Have a contingency in your budget for surprises – typically 10-15% of the project cost is a good cushion (Loft Conversion Process: Step by Step Guide). Unforeseen expenses (like needing to upgrade an old fuse box to handle new electrics, or repairing hidden rot) can pop up. If you’re financially prepared, these won’t cause work to stop or stress. Also, stage your payments so you’re never paying for more work than has been completed – this keeps the contractor motivated to finish and protects you from loss if anything goes awry (Extensions – a homeowner’s guide to extending your living space).
By following these tips and the steps above, you’ll put yourself in a great position to successfully complete a roof extension with minimal hassle. Remember that expanding your home is a marathon, not a sprint: careful planning, the right expertise, and good communication are the keys to crossing the finish line with a result you love.
Conclusion
A roof extension can dramatically improve your home’s space and value, but it requires navigating a maze of regulations and practical challenges. In England, always start by checking what’s allowed under planning rules (Permitted Development can be a boon) and get the necessary permissions in place. Concurrently, line up building regulations approval – a legal must for safety – and assemble a team of professionals you trust to design and build the extension. Keep realistic timeline expectations, stay organized with paperwork, and maintain open lines of communication throughout the project. With due diligence and the right help, you’ll convert that empty loft or underused roof space into a fantastic new part of your home.
Good luck with your project, and enjoy the process of watching your vision take shape above your head!
Sources:
- HomeOwners Alliance – Loft Conversion: Where Do I Start? (planning permission and building regulations) (Loft Conversion: Where Do I Start? – HomeOwners Alliance)
- Federation of Master Builders – Loft Conversions: The Ultimate Guide (Permitted Development rules and building regs requirement) (Loft conversions: The ultimate guide | FMB, Federation of Master Builders)
- Planning Portal – Guidance on roof extensions and applicable limits (Permitted Development criteria) (Loft conversions: The ultimate guide | FMB, Federation of Master Builders)
- Gov.uk – Permitted Development Technical Guidance (advice on lawful development and PD rights) (Title)
- Design for Me – Building Control for Extensions (Full Plans vs Building Notice explained) (Building control regulations for an extension – Design for Me)
- MyBuilder Q&A – typical loft conversion construction timelines (user experiences) (How long will a loft conversion take? – MyBuilder)
- Checkatrade – How Long Does a Loft Conversion Take? (timeline considerations) (How Long Does a Loft Conversion Take? | Checkatrade) (Loft conversions: The ultimate guide | FMB, Federation of Master Builders)
- HomeOwners Alliance – tips on saving costs and avoiding planning permission by using PD (Loft Conversion: Where Do I Start? – HomeOwners Alliance)
- Various council and expert resources on planning application requirements and party wall matters (Loft Conversion: Where Do I Start? – HomeOwners Alliance).
Contact us to realize your project.